> ## Documentation Index
> Fetch the complete documentation index at: https://docs.apimart.ai/llms.txt
> Use this file to discover all available pages before exploring further.
# Using APIMart in Cherry Studio
> Detailed guide on how to configure and use APIMart API service in Cherry Studio desktop client. This guide will help you configure APIMart API in Cherry Studio to access rich AI model resources.
## Prerequisites
Before you begin, please ensure:
1. **Cherry Studio is installed**\
Download and install the version suitable for your operating system from [Cherry Studio Official Website](https://cherry-ai.com/)
2. **APIMart API Key obtained**\
Log in to [APIMart Console](https://apimart.ai/keys) to get your API key (starts with `sk-`)
**Tip:** If you don't have an APIMart account yet, please register at [APIMart](https://apimart.ai) and obtain an API key first.
## Step 1: Open Cherry Studio Settings
After launching Cherry Studio, navigate to the settings page:
1. Click the **⚙️ Settings** icon (gear icon) in the top right corner
2. Or use keyboard shortcuts:
* Windows/Linux: `Ctrl + ,`
* macOS: `Cmd + ,`
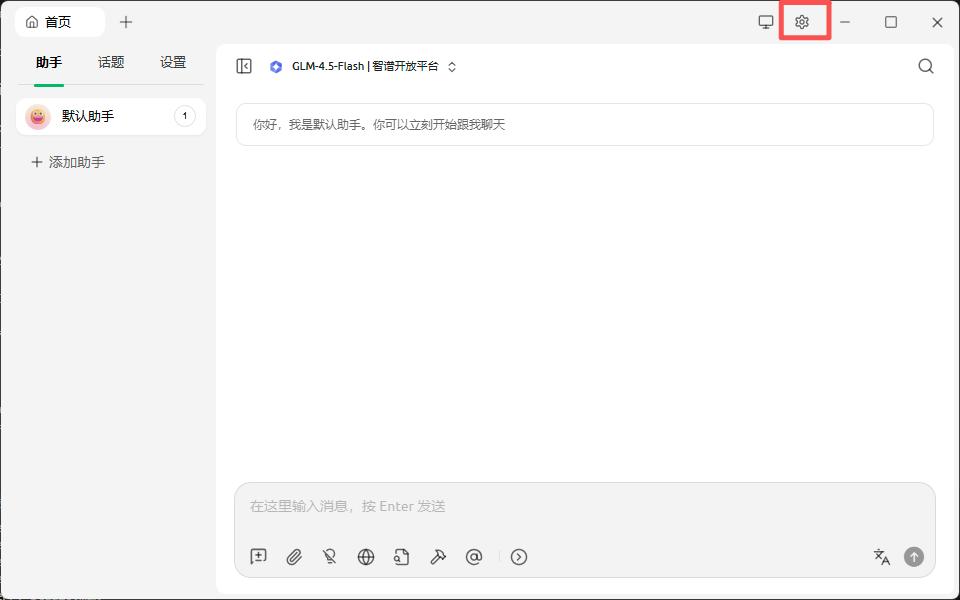 *Cherry Studio main interface, click the gear icon in the top right to access settings*
## Step 2: Add APIMart Model Platform
### 2.1 Access Model Service Management
In the settings page:
1. Find the **Model Service** option in the left menu
2. Click to enter model service management page
*Cherry Studio main interface, click the gear icon in the top right to access settings*
## Step 2: Add APIMart Model Platform
### 2.1 Access Model Service Management
In the settings page:
1. Find the **Model Service** option in the left menu
2. Click to enter model service management page
 *Find "Model Service" option in the left menu of settings page*
### 2.2 Add APIMart Provider
1. At the bottom of the model service page, click the **"+ Add"** button
*Find "Model Service" option in the left menu of settings page*
### 2.2 Add APIMart Provider
1. At the bottom of the model service page, click the **"+ Add"** button
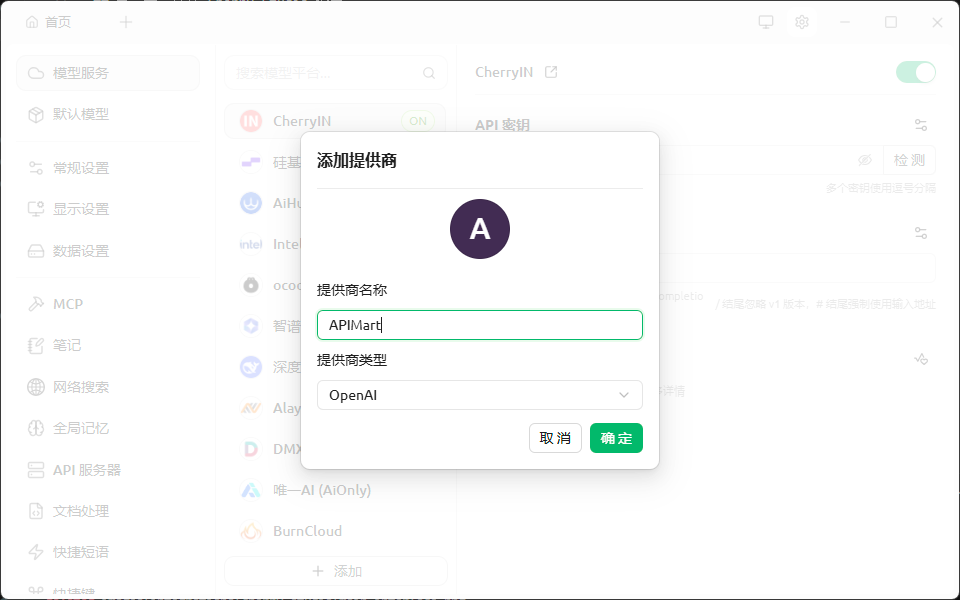 *Click "+ Add" to open the add provider dialog*
2. In the **"Add Provider"** dialog, fill in:
* **Provider Name**: `APIMart` (customizable)
* **Provider Type**: Select `OpenAI`
3. Click the **"Confirm"** button
### 2.3 Configure APIMart API Information
After adding the provider, fill in the API information in the right configuration area:
| Field | Value |
| ----------- | ---------------------------------------- |
| **API Key** | Your APIMart API key (`sk-xxxxxxxxxxxx`) |
| **API URL** | `https://api.apimart.ai` |
**Important:**
* API URL must be `https://api.apimart.ai` (do not include `/v1` or other paths)
* API Key must be obtained from APIMart console and start with `sk-`
* After filling in, you can click the **"Test"** button to test the connection
*Click "+ Add" to open the add provider dialog*
2. In the **"Add Provider"** dialog, fill in:
* **Provider Name**: `APIMart` (customizable)
* **Provider Type**: Select `OpenAI`
3. Click the **"Confirm"** button
### 2.3 Configure APIMart API Information
After adding the provider, fill in the API information in the right configuration area:
| Field | Value |
| ----------- | ---------------------------------------- |
| **API Key** | Your APIMart API key (`sk-xxxxxxxxxxxx`) |
| **API URL** | `https://api.apimart.ai` |
**Important:**
* API URL must be `https://api.apimart.ai` (do not include `/v1` or other paths)
* API Key must be obtained from APIMart console and start with `sk-`
* After filling in, you can click the **"Test"** button to test the connection
 *Fill in API key and API URL, ensure APIMart provider status is ON (green switch)*
## Step 3: Add and Manage Models
### 3.1 Open Model Management
After configuring the APIMart provider:
1. Ensure the APIMart provider switch in the top right is **ON** (green)
2. In the right configuration area, find the **"Models"** section
3. Click the **"Manage"** button to open the model selection window
*Fill in API key and API URL, ensure APIMart provider status is ON (green switch)*
## Step 3: Add and Manage Models
### 3.1 Open Model Management
After configuring the APIMart provider:
1. Ensure the APIMart provider switch in the top right is **ON** (green)
2. In the right configuration area, find the **"Models"** section
3. Click the **"Manage"** button to open the model selection window
 *Click "Manage" button to open APIMart model selection window*
### 3.2 Add Desired Models
In the model selection window:
1. Use the search box to find specific models
2. Use the category tabs at the top to filter: **All**, **Reasoning**, **Vision**, **Web**, **Free**, **Embedding**, **Rerank**, **Tool**
3. Find the models you want and click the **+** button on the right to add:
* `gpt-4o` / `chatgpt-4o` - OpenAI GPT-4o model
* `gpt-4o-mini` - Faster and more economical version
* `claude-3` series - Claude 3 models (with multiple variants)
* `claude_code_sonnet-4` - Claude Code Sonnet 4
* `claude_code_haiku-4` - Claude Code Haiku 4
* `gemini-2.0-flash-exp` - Google Gemini 2.0 Flash
*Click "Manage" button to open APIMart model selection window*
### 3.2 Add Desired Models
In the model selection window:
1. Use the search box to find specific models
2. Use the category tabs at the top to filter: **All**, **Reasoning**, **Vision**, **Web**, **Free**, **Embedding**, **Rerank**, **Tool**
3. Find the models you want and click the **+** button on the right to add:
* `gpt-4o` / `chatgpt-4o` - OpenAI GPT-4o model
* `gpt-4o-mini` - Faster and more economical version
* `claude-3` series - Claude 3 models (with multiple variants)
* `claude_code_sonnet-4` - Claude Code Sonnet 4
* `claude_code_haiku-4` - Claude Code Haiku 4
* `gemini-2.0-flash-exp` - Google Gemini 2.0 Flash
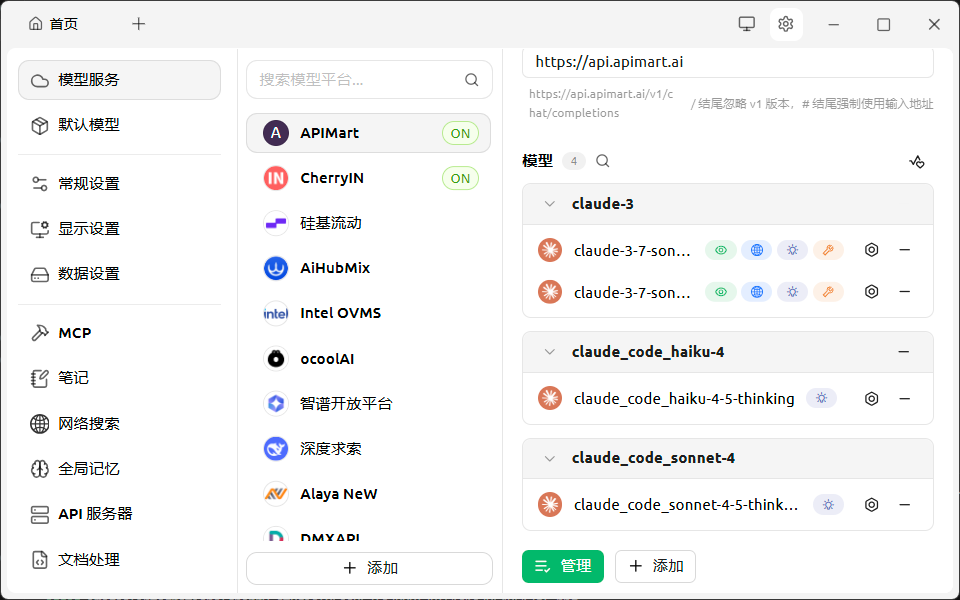 *Added models will appear on the right, can be expanded to view specific variants*
4. After adding all desired models, close the model selection window
**Recommended Models:**
* 💰 **Cost-effective:** `gpt-4o-mini`, `claude_code_haiku-4`
* 🚀 **High-performance:** `gpt-4o` / `chatgpt-4o`, `claude_code_sonnet-4`
* 🎨 **Multimodal:** `claude-3` series, `gemini-2.0-flash-exp`
## Step 4: Start Chatting
After configuration, you can start using it:
1. Return to the main interface, click the **"+"** at the top or select an existing chat
2. At the top of the chat page, click the model selector
3. Select a model under the **APIMart** provider
4. Start chatting with AI!
*Added models will appear on the right, can be expanded to view specific variants*
4. After adding all desired models, close the model selection window
**Recommended Models:**
* 💰 **Cost-effective:** `gpt-4o-mini`, `claude_code_haiku-4`
* 🚀 **High-performance:** `gpt-4o` / `chatgpt-4o`, `claude_code_sonnet-4`
* 🎨 **Multimodal:** `claude-3` series, `gemini-2.0-flash-exp`
## Step 4: Start Chatting
After configuration, you can start using it:
1. Return to the main interface, click the **"+"** at the top or select an existing chat
2. At the top of the chat page, click the model selector
3. Select a model under the **APIMart** provider
4. Start chatting with AI!
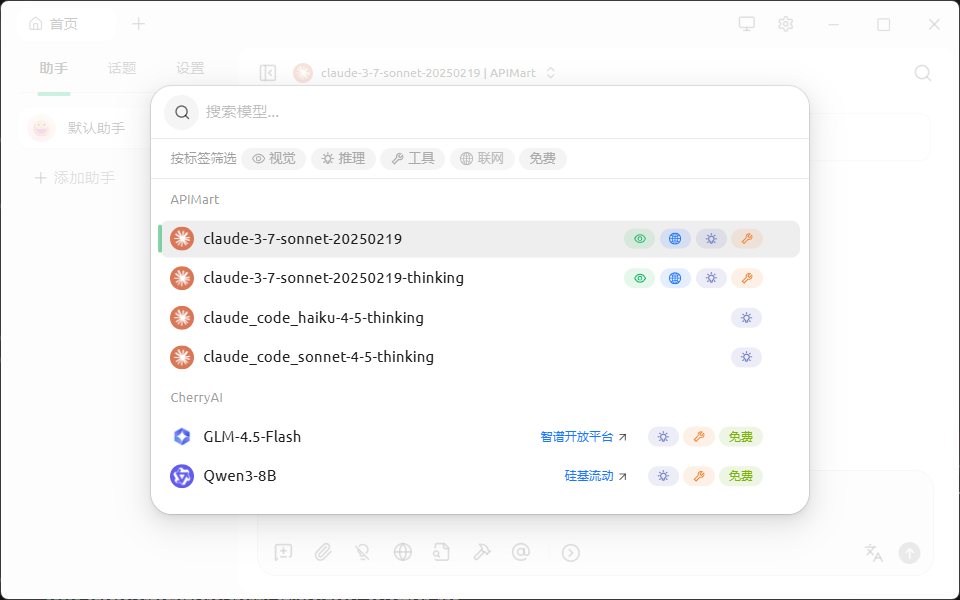 *Create a new chat and select APIMart provider and model*
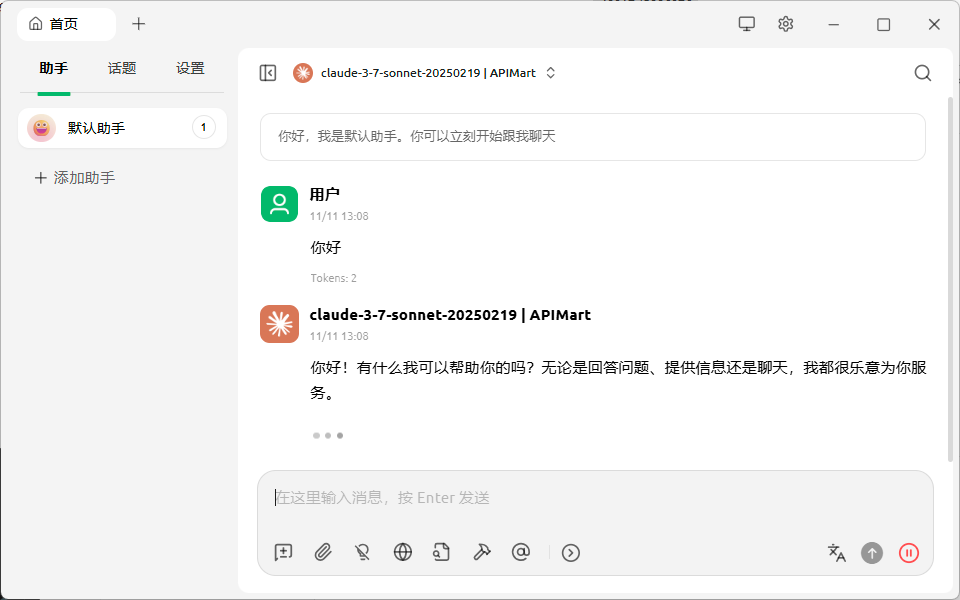 *Cherry Studio chat interface example*
## FAQ
### Q1: Cannot connect to APIMart service?
**Solution:**
1. **Check Base URL**:
* Ensure Base URL is `https://api.apimart.ai`
* Do not add `/v1` suffix
2. **Verify API Key**:
* Confirm API Key is correct and starts with `sk-`
* Check if the key is valid in [APIMart Console](https://apimart.ai/keys)
3. **Check Network Connection**:
* Ensure you can access `https://api.apimart.ai`
* You may need to configure a proxy if in China
### Q2: Model list is empty or cannot refresh?
**Solution:**
1. **Manually Add Models**:
* If auto-refresh fails, you can manually add common models
* In model management, manually enter model names (e.g., `gpt-4o`)
2. **Check API Permissions**:
* Confirm your API Key has permission to access the model list
* Contact APIMart support to check account status
### Q3: Error messages during conversation?
**Common errors and solutions:**
| Error Message | Cause | Solution |
| --------------------------- | ---------------------------- | ------------------------------------------ |
| `401 Unauthorized` | Invalid or expired API Key | Re-obtain API Key and update configuration |
| `429 Too Many Requests` | Request rate limit exceeded | Wait a moment and retry |
| `500 Internal Server Error` | Temporary server issue | Wait a few minutes and retry |
| `insufficient_quota` | Insufficient account balance | Top up in the console |
### Q4: How to view API usage and costs?
Log in to [APIMart Console](https://apimart.ai/overview) to view:
* 📊 API call statistics
* 💰 Cost details
* 📈 Usage trend charts
## Features
Using Cherry Studio + APIMart, you can:
* 💬 **Multi-model Conversations** - Use different AI models in the same interface
* 🖼️ **Image Understanding** - Multi-modal conversations with image input support
* 📝 **Context Management** - Intelligent management of conversation history and context
* 🎨 **Custom Prompts** - Create and manage prompt templates
* 📊 **Export Conversations** - Export conversation records to Markdown and other formats
* 🔄 **Model Comparison** - Use multiple models simultaneously and compare outputs
## Support & Help
If you encounter any issues:
* 📚 [APIMart Documentation](https://docs.apimart.ai)
* 💬 [Discord Community](https://discord.gg/V8zqssyZ5c)
* 🐦 [Twitter @APIMart\_](https://x.com/APIMart_)
* 📧 Technical Support: [zhihong@apimart.ai](mailto:zhihong@apimart.ai)
***
Register for APIMart now, get your API key, and start your AI journey!
*Cherry Studio chat interface example*
## FAQ
### Q1: Cannot connect to APIMart service?
**Solution:**
1. **Check Base URL**:
* Ensure Base URL is `https://api.apimart.ai`
* Do not add `/v1` suffix
2. **Verify API Key**:
* Confirm API Key is correct and starts with `sk-`
* Check if the key is valid in [APIMart Console](https://apimart.ai/keys)
3. **Check Network Connection**:
* Ensure you can access `https://api.apimart.ai`
* You may need to configure a proxy if in China
### Q2: Model list is empty or cannot refresh?
**Solution:**
1. **Manually Add Models**:
* If auto-refresh fails, you can manually add common models
* In model management, manually enter model names (e.g., `gpt-4o`)
2. **Check API Permissions**:
* Confirm your API Key has permission to access the model list
* Contact APIMart support to check account status
### Q3: Error messages during conversation?
**Common errors and solutions:**
| Error Message | Cause | Solution |
| --------------------------- | ---------------------------- | ------------------------------------------ |
| `401 Unauthorized` | Invalid or expired API Key | Re-obtain API Key and update configuration |
| `429 Too Many Requests` | Request rate limit exceeded | Wait a moment and retry |
| `500 Internal Server Error` | Temporary server issue | Wait a few minutes and retry |
| `insufficient_quota` | Insufficient account balance | Top up in the console |
### Q4: How to view API usage and costs?
Log in to [APIMart Console](https://apimart.ai/overview) to view:
* 📊 API call statistics
* 💰 Cost details
* 📈 Usage trend charts
## Features
Using Cherry Studio + APIMart, you can:
* 💬 **Multi-model Conversations** - Use different AI models in the same interface
* 🖼️ **Image Understanding** - Multi-modal conversations with image input support
* 📝 **Context Management** - Intelligent management of conversation history and context
* 🎨 **Custom Prompts** - Create and manage prompt templates
* 📊 **Export Conversations** - Export conversation records to Markdown and other formats
* 🔄 **Model Comparison** - Use multiple models simultaneously and compare outputs
## Support & Help
If you encounter any issues:
* 📚 [APIMart Documentation](https://docs.apimart.ai)
* 💬 [Discord Community](https://discord.gg/V8zqssyZ5c)
* 🐦 [Twitter @APIMart\_](https://x.com/APIMart_)
* 📧 Technical Support: [zhihong@apimart.ai](mailto:zhihong@apimart.ai)
***
Register for APIMart now, get your API key, and start your AI journey!